勉強会に使った資料を、Slideshareにあげました。
Story boardを使わず、UIKitを使ってアプリを作成する方法
http://www.slideshare.net/SatosiOkubo/uikit
Observerパターンを、Objective-Cで実現する方法(Delegate,Notification,KVO)
http://www.slideshare.net/SatosiOkubo/ios-observer-delegatenotificationkvo
UITableViewをツリー上に表示する。第5回目(見栄えをかっこよく)
今回でツリーテーブルは、最終回です。
最後は見栄えを少し修正します。えぇ少しです。
変更は3点
- 色の変更
- セルとページヘッダーの上下に線を入れる。
- セクションの背景をグラデーションにする。
色を変更します、CustomCellの色を下記のように変更します。
- (void)setCellSelected:(bool)cellSelected {
    cellSelected_ = cellSelected;
    if (cellSelected_) {
        self.backgroundColor = [UIColor colorWithRed:0.29
                                               green:0.22
                                                blue:0.29
                                               alpha:1.0];
    } else {
        self.backgroundColor = [UIColor colorWithRed:0.19
                                               green:0.22
                                                blue:0.29
                                               alpha:1.0];
    }
}
CustomCellに線を入れます。セルの上端に白い線。セルの下端に黒い線を引くために、下記メソッドを書き足します。
-(void)drawRect:(CGRect)rect {
	// 罫線
    int height = self.frame.size.height;
    int width = self.frame.size.width;
	CGContextRef context = UIGraphicsGetCurrentContext();

    CGContextMoveToPoint(context, 0, 0);
	CGContextAddLineToPoint(context, width, 0);
	CGContextSetLineWidth(context, 1.0);
	CGContextSetRGBStrokeColor(context, 1.0, 1.0, 1.0, 0.5);
	CGContextStrokePath(context);

    CGContextMoveToPoint(context, 0, height);
	CGContextAddLineToPoint(context, width, height);
	CGContextSetLineWidth(context, 1.0);
	CGContextSetRGBStrokeColor(context, 0.0, 0.0, 0.0, 0.5);
	CGContextStrokePath(context);
}
PageHeaderにも同様に線をいれます。
-(void)drawRect:(CGRect)rect {
	// 罫線
    int height = self.frame.size.height;
    int width = self.frame.size.width;
	CGContextRef context = UIGraphicsGetCurrentContext();

    CGContextMoveToPoint(context, 0, 0);
	CGContextAddLineToPoint(context, width, 0);
	CGContextSetLineWidth(context, 1.0);
	CGContextSetRGBStrokeColor(context, 1.0, 1.0, 1.0, 0.5);
	CGContextStrokePath(context);

    CGContextMoveToPoint(context, 0, height);
	CGContextAddLineToPoint(context, width, height);
	CGContextSetLineWidth(context, 1.0);
	CGContextSetRGBStrokeColor(context, 0.0, 0.0, 0.0, 0.5);
	CGContextStrokePath(context);
}
セクションの背景をグラデーションにします。Quartzを使うので、ヘッダーファイルのインクルードとQuartzCore.frameworkをLink Binalyに加えます。そして、背景書の設定をグラデーションするように書き換えます。
#import "SectionHeader.h"
#import <QuartzCore/QuartzCore.h>

@implementation SectionHeader
@synthesize sectionNo = sectionNo_;
@synthesize delegate  = delegate_;

- (id)initWithFrame:(CGRect)frame
{
    self = [super initWithFrame:frame];
    if (self) {
        float fontSize = 14.0;
        float marginSize = 5.0;
        float iconSize = 10.0;
        float sectionNamePos = marginSize * 2 + iconSize;

        // セルの背景色(グラデーション)
        CAGradientLayer *pageGradient = [CAGradientLayer layer];
        pageGradient.frame = self.frame;
        pageGradient.colors =
        [NSArray arrayWithObjects:
         (id)[UIColor colorWithRed:0.26 green:0.29 blue:0.36 alpha:1.0].CGColor,
         (id)[UIColor colorWithRed:0.22 green:0.25 blue:0.32 alpha:1.0].CGColor,
         nil];
        [self.layer insertSublayer:pageGradient atIndex:0];
       ・
       ・
       ・
以上で完了、動かしてみるとこんな感じになります。

一手間で、だいぶ見栄えがかっこ良くなるものです。
以上で、ツリーテーブルは完成。facebookのUIと同じものが作れそうですね。
UITableViewをツリー上に表示する。第4回目(ツリーの開閉、セルの選択)
前回までで表示部分はだいたい完成したので、今回は動きの部分を実装していきます。
動きとして実装したいのは
- セクション選択時に、セクションが開閉する。
- セルを複数選択可能にする。
まず、セクション選択時の動きですが、セクションが選択されたことを検出し、閉じる動作(配下の非表示)を行わなければなりません。セクション選択の検出は、今回はデリゲートで実装します。
新しくSectionHeaderDelegateプロトコルを作成します。ようはインターフェースを定義したヘッダーファイルです。
#import <Foundation/Foundation.h>

@protocol SectionHeaderDelegate <NSObject>
@optional
-(void)sectionSelected:(int)sectionNo;
@end
次に、委譲もとの実装をしていきます。
SectionHeaderを次のように修正します。さきほど作成したSectionHeaderDelegate.hのインポート、デリゲートメソッドを実装する移譲先のクラスへの参照を保持するdelegate_メンバ変数。またその変数にアクセスするためのプロパティ定義を行います。
また、implementationにtouchesBeganメソッドを追加し、デリゲートメソッドを呼び出す実装を記述します。
#import <UIKit/UIKit.h>
#import "SectionHeaderDelegate.h"

@interface SectionHeader : UIView {
@private
    UILabel* sectionNameLabel_;
    UIImageView* switchIcon_;
    UIImage* openImage_;
    UIImage* closeImage_;

    __weak NSObject<SectionHeaderDelegate>* delegate_; //ココ
}
@property(nonatomic) int sectionNo;
@property(weak, nonatomic) NSObject<SectionHeaderDelegate>* delegate; //ココ
@property(strong, nonatomic, setter=setSectionName:) NSString* sectionName;
@property(nonatomic, setter=setSectionOpend:) bool sectionOpend;

@end

@implementation SectionHeader
@synthesize sectionNo = sectionNo_;
@synthesize delegate  = delegate_; //ココ

- (id)initWithFrame:(CGRect)frame
{
 ・
 ・
 ・
#pragma mark -
#pragma mark SectionHeaderDelegate
#pragma mark -

//ココ
- (void)touchesBegan:(NSSet*)touches withEvent:(UIEvent*)event {
    if (delegate_ != nil) {
        if ([delegate_ conformsToProtocol:@protocol(SectionHeaderDelegate)]) {
            if ([delegate_ respondsToSelector:@selector(sectionSelected:)]) {
                [delegate_ sectionSelected:sectionNo_];
            }
        }
    }
}
@end
これでセクションがタッチされた時に、メソッドを呼ぶ準備ができました。委譲先となるTreeTableViewController側にタッチされた時の動作を記述します。
#import <UIKit/UIKit.h>
#import "SectionHeaderDelegate.h" // ココ

@interface TreeTableViewController : UITableViewController <SectionHeaderDelegate> { // ココ
@private
    // Data Source
    NSMutableArray* dataSource_;
}
@property(strong, nonatomic, setter=setDataSource:) NSMutableArray* dataSource;

@end

@implementation TreeTableViewController
 ・
 ・
 ・
- (UIView *)tableView:(UITableView *)tableView viewForHeaderInSection:(NSInteger)sectionNum {
    Animals *section = [dataSource_ objectAtIndex:sectionNum];

    // カスタムセクションの作成
    SectionHeader *sectionView = [[SectionHeader alloc]
                           initWithFrame:CGRectMake(0,
                                                    0,
                                                    self.tableView.frame.size.width,
                                                    50)];
    sectionView.sectionNo = sectionNum;
    sectionView.sectionName = section.sectionName;
    sectionView.sectionOpend = section.openFlag;
    sectionView.delegate = self; // ココ

    return sectionView;
}
 ・
 ・
 ・
#pragma mark -
#pragma mark CustomSectionViewDelegate
#pragma mark -

// ココ
-(void)sectionSelected:(int)sectionNo {
    Animals *section = [dataSource_ objectAtIndex:sectionNo];
    section.openFlag = !section.openFlag;

    [self.tableView reloadData];
}
この状態で動かしてみます、セクションをタッチすると開閉するようになりました。だいだい目指すべきことはできましたが、おまけでセルの選択をできるようにしておきます。allowsMultipleSelectionを独自実装します。
#pragma mark - Table view delegate


- (void)tableView:(UITableView *)tableView didSelectRowAtIndexPath:(NSIndexPath *)indexPath {
    // データソースより、そのセルに該当するデータを取得
    Animals *section = [dataSource_ objectAtIndex:indexPath.section];
    CreatureType *row = [section.types objectAtIndex:indexPath.row];

    // 選択された行の選択をON/OFF反転
    row.selected = !row.selected;

    [tableView reloadData];
}

- (void)tableView:(UITableView *)tableView willDisplayCell:(UITableViewCell *)cell forRowAtIndexPath:(NSIndexPath *)indexPath {
    // データソースより、そのセルに該当するデータを取得
    Animals *section = [dataSource_ objectAtIndex:indexPath.section];
    CreatureType *row = [section.types objectAtIndex:indexPath.row];

    // 行の選択色変更
    ((CustomCell*)cell).cellSelected = row.selected;
}
これで、複数選択できるようになりました。

動きなど基本的な部分はこれで完成です。次回で最終回、見栄えを整えて完成といたします。
UITableViewをツリー上に表示する。第3回目(UI部品をUITableViewに組み込み)
ツリーテーブルの3回目。今回は、本体の部分であるUITableViewを作成していきます。
本体となる、TreeTableViewControllerを作成します、基底クラスにUITableViewControlerを指定します。また、表示するデータを保持するメンバ変数として、データソース(dataSource_)を定義して、そのプロパティ(セッター)も定義しておきます。(必要なヘッダーもimportしておく)
#import <UIKit/UIKit.h>
#import "Animals.h"
#import "CreatureType.h"
#import "PageHeader.h"
#import "SectionHeader.h"
#import "CustomCell.h"


@interface TreeTableViewController : UITableViewController {
@private
    // Data Source
    NSMutableArray* dataSource_;
}
@property(strong, nonatomic, setter=setDataSource:) NSMutableArray* dataSource;

@end

@implementation TreeTableViewController
@synthesize dataSource = dataSource_;

- (id)initWithStyle:(UITableViewStyle)style
 ・
 ・
 ・
次に、これを起動時に表示するように次のように修正します。2012-08--11の記事から、次のように書き換えます。AppDelegate.mでセットされるrootViewControlerをTreeTableViewControllerに変更します。
- (BOOL)application:(UIApplication *)application didFinishLaunchingWithOptions:(NSDictionary *)launchOptions
{
    self.window = [[UIWindow alloc] initWithFrame:[[UIScreen mainScreen] bounds]];
    // Override point for customization after application launch.
    self.viewController = [[TreeTableViewController alloc] init];

    self.window.rootViewController = self.viewController;
    [self.window makeKeyAndVisible];
    return YES;
}
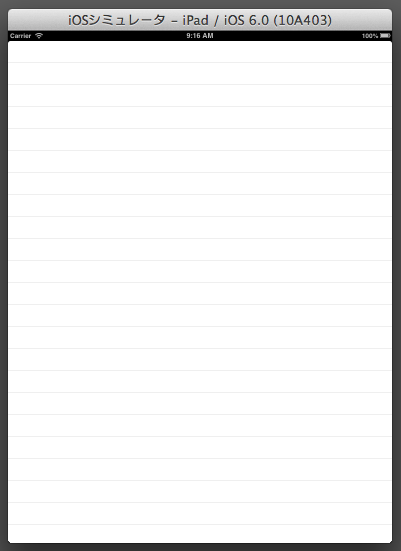
これで起動すると、何もないテーブルが表示されるはずです。

次にデータソースのデリゲートを実装していきます。
セクションの数を返すメソッド、セクション内の行数を返すメソッドを次のように作成します。
- (NSInteger)numberOfSectionsInTableView:(UITableView *)tableView
{
    // Return the number of sections.
    if (dataSource_) {
        return [dataSource_ count];
    } else {
        return 0;
    }
}

- (NSInteger)tableView:(UITableView *)tableView numberOfRowsInSection:(NSInteger)sectionNumber
{
    // Return the number of rows in the section.
    if (dataSource_) {
        Animals *section = [dataSource_ objectAtIndex:sectionNumber];
        if (section.openFlag) {
            return [section.types count];
        } else {
            return 0;
        }
    } else {
        return 0;
    }
}
次にツリーの親、セクションヘッダーを表示するデリゲートメソッドのviewForHeaderInSectionを作ります。ここで、セクションに表示するUIViewをreturnすることで、セクションにそのUIViewを表示することができます。sectionNumが引数で渡されますので、データソースよりセクション番号にあった値を取り出し表示してあげます。
- (UIView *)tableView:(UITableView *)tableView viewForHeaderInSection:(NSInteger)sectionNum {
    Animals *section = [dataSource_ objectAtIndex:sectionNum];

    // カスタムセクションの作成
    SectionHeader *sectionView = [[SectionHeader alloc]
                           initWithFrame:CGRectMake(0,
                                                    0,
                                                    self.tableView.frame.size.width,
                                                    50)];
    sectionView.sectionNo = sectionNum;
    sectionView.sectionName = section.sectionName;
    sectionView.sectionOpend = section.openFlag;

    return sectionView;
}

- (CGFloat)tableView:(UITableView *)tableView heightForHeaderInSection:(NSInteger)section
{
    return 50;
}
ツリーの子、カスタムセルを表示するデリゲートメソッドのcellForRowAtIndexPathを作ります。indexPathが引数で渡されますので、データソースより行番号にあった値を取り出し表示してあげます。
- (UITableViewCell *)tableView:(UITableView *)tableView cellForRowAtIndexPath:(NSIndexPath *)indexPath
{
    UITableViewCell *cell;

    // Data Sourceより該当行の値をとりだし
    Animals *section = [dataSource_ objectAtIndex:indexPath.section];
    CreatureType *row = [section.types objectAtIndex:indexPath.row];

    // カスタムセルの作成
    cell = [tableView dequeueReusableCellWithIdentifier:@"custum"];
    if (cell == nil) {
        cell = [[CustomCell alloc] initWithStyle:UITableViewCellStyleDefault
                                 reuseIdentifier:@"custum"];
        cell.frame = CGRectMake(0, 0, self.tableView.frame.size.width, 50.0);
    }

    // 名前
    ((CustomCell*)cell).cellName = row.typeName;

    // 選択状態
    ((CustomCell*)cell).cellSelected = row.selected;

	return cell;
}

- (CGFloat)tableView:(UITableView *)tableView heightForRowAtIndexPath:(NSIndexPath *)indexPath {
	return 50.0;
}
おまけにページヘッダーを表示します。TreeTableViewControllerのinitWithStyleメソッドに、ページヘッダーの作成を追加します。
@implementation TreeTableViewController
@synthesize dataSource = dataSource_;

- (id)initWithStyle:(UITableViewStyle)style
{
    self = [super initWithStyle:style];
    if (self) {
        // ページヘッダー
        PageHeader *headerView = [[PageHeader alloc] initWithFrame:CGRectMake(0,
                                                                          0,
                                                                          self.tableView.frame.size.width,
                                                                          50)];
        headerView.titleName = @"動物";
        self.tableView.tableHeaderView  = headerView;
    }
    return self;
}
これで表示の準備ができましたので、テストデータを作成して動かしてみます。テストデータはとりあえず、AppDelegateで作成してTreeTableViewControllerのdataSourceプロパティにセットします。
- (BOOL)application:(UIApplication *)application didFinishLaunchingWithOptions:(NSDictionary *)launchOptions
{
    self.window = [[UIWindow alloc] initWithFrame:[[UIScreen mainScreen] bounds]];
    // Override point for customization after application launch.
    self.viewController = [[TreeTableViewController alloc] init];

    // テストデータ
    NSMutableArray *sections = [[NSMutableArray alloc] init];
    NSMutableArray *rows1 = [[NSMutableArray alloc] initWithObjects:
                             [[CreatureType alloc] initWithTypeName:@"犬" selected:false],
                             [[CreatureType alloc] initWithTypeName:@"ネコ" selected:false],
                             [[CreatureType alloc] initWithTypeName:@"ジャンクロードバンダム" selected:false],
                             nil];
    [sections addObject:[[Animals alloc] initWithSectionName:@"ほ乳類"
                                                    openFlag:true
                                                       types:rows1]];
    NSMutableArray *rows2 = [[NSMutableArray alloc] initWithObjects:
                             [[CreatureType alloc] initWithTypeName:@"さんま" selected:false],
                             [[CreatureType alloc] initWithTypeName:@"マグロ" selected:false],
                             [[CreatureType alloc] initWithTypeName:@"白星姫" selected:false],
                             nil];
    [sections addObject:[[Animals alloc] initWithSectionName:@"魚類"
                                                    openFlag:true
                                                       types:rows2]];
    self.viewController.dataSource = sections;

    self.window.rootViewController = self.viewController;
    [self.window makeKeyAndVisible];
    return YES;
}
起動してみると、このように表示されるはずです。

今回はここまで、次回はセクション選択時に開閉するような動きを実装していきます。
UITableViewをツリー上に表示する。第2回目(テーブルのUI部品を作成)
ツリーテーブルの2回目。今回から表示部分を実装していきます。
ツリーテーブルの表示としては、大きく3つ。
- 一番上のヘッダー
- ツリーの親
- ツリーの子
となります。
それぞれを、UITableの
- ページヘッダー
- セクションヘッダー
- セル
で実現します。
それではUIの部分を作成していきます。
まずは、ページヘッダー。ベースとなるUIViewと上に表示するタイトルのUILabelで構成します。
@interface PageHeader : UIView {
@private
    UILabel* titleLabel_;
}
@property(strong, nonatomic, setter=setTitleName:) NSString* titleName;

@end

@implementation PageHeader

- (id)initWithFrame:(CGRect)frame
{
    self = [super initWithFrame:frame];
    if (self) {
        float fontSize = 14.0;
        float marginSize = 10.0;
        titleLabel_ = [[UILabel alloc] initWithFrame:
                       CGRectMake(marginSize,
                                  (frame.size.height - fontSize) / 2,
                                  frame.size.width - marginSize,
                                  fontSize)];
        titleLabel_.font = [UIFont fontWithName:@"Verdana" size:fontSize];
        titleLabel_.textColor = [UIColor whiteColor];
        titleLabel_.backgroundColor = [UIColor colorWithRed:0.0
                                                      green:0.0
                                                       blue:0.0
                                                      alpha:0.0];
        [self addSubview:titleLabel_];

        // ページヘッダーの背景色
        self.backgroundColor = [UIColor darkGrayColor];
    }
    return self;
}

- (void)setTitleName:(NSString*)titleName {
	titleLabel_.text = titleName;
}

@end
次はセクションヘッダーです。ページヘッダーと同様にUIViewをベースにします。上にツリーの開閉を視覚的に表すUIImageView(+ 開閉のイメージを保持するUIImage)、名前を表示するUILabelで構成します。
#import <UIKit/UIKit.h>

@interface SectionHeader : UIView {
@private
    UILabel* sectionNameLabel_;
    UIImageView* switchIcon_;
    int sectionNo_;
    UIImage* openImage_;
    UIImage* closeImage_;
}
@property(nonatomic) int sectionNo;
@property(strong, nonatomic, setter=setSectionName:) NSString* sectionName;
@property(nonatomic, setter=setSectionOpend:) bool sectionOpend;

@end


@implementation SectionHeader
@synthesize sectionNo = sectionNo_;

- (id)initWithFrame:(CGRect)frame
{
    self = [super initWithFrame:frame];
    if (self) {
        float fontSize = 12.0;
        float marginSize = 5.0;
        float iconSize = 10.0;
        float sectionNamePos = marginSize * 2 + iconSize;

        // 開閉のアイコン
        switchIcon_ = [[UIImageView alloc] initWithFrame:
                             CGRectMake(marginSize,
                                        (frame.size.height - iconSize) / 2,
                                        iconSize,
                                        iconSize)];
        [self addSubview:switchIcon_];

        // 開閉のイメージ
        openImage_ = [UIImage imageNamed:@"open.png"];
        closeImage_ = [UIImage imageNamed:@"close.png"];

        // セクションの名前
        sectionNameLabel_ = [[UILabel alloc] initWithFrame:
                       CGRectMake(sectionNamePos,
                                  (frame.size.height - fontSize) / 2,
                                  frame.size.width - sectionNamePos,
                                  fontSize)];
        sectionNameLabel_.font = [UIFont fontWithName:@"Verdana" size:fontSize];
        sectionNameLabel_.textColor = [UIColor whiteColor];
        sectionNameLabel_.backgroundColor = [UIColor colorWithRed:0.0
                                                            green:0.0
                                                             blue:0.0
                                                            alpha:0.0];
        [self addSubview:sectionNameLabel_];

        // セルの背景色
        self.backgroundColor = [UIColor darkGrayColor];
}
    return self;
}

- (void)setSectionName:(NSString*)sectionName {
	sectionNameLabel_.text = sectionName;
}

- (void)setSectionOpend:(bool)sectionOpend {
    if (sectionOpend) {
        switchIcon_.image = openImage_;
    } else {
        switchIcon_.image = closeImage_;
    }
}

@end
最後にセルです。セルはUITableViewCellをベースに、上に名前を表示するUILabelで構成します。また選択状態を保持する、bool値をメンバ変数に加えておきます。
#import <UIKit/UIKit.h>

@interface CustomCell : UITableViewCell {
@private
    UILabel* cellNameLabel_;
    bool cellSelected_;
}
@property(strong, nonatomic, setter=setCellName:) NSString* cellName;
@property(nonatomic, setter=setCellSelected:, getter=cellSelected) bool cellSelected;

@end

@implementation CustomCell

- (id)initWithStyle:(UITableViewCellStyle)style reuseIdentifier:(NSString *)reuseIdentifier
{
    self = [super initWithStyle:style reuseIdentifier:reuseIdentifier];
    if (self) {
        float fontSize = 12.0;
        float marginSize = 20.0;
        float nameSize = 300.0;
        float cellHeight = 50.0; // セルの高さとりあえず固定
        cellNameLabel_ = [[UILabel alloc] initWithFrame:
                       CGRectMake(marginSize,
                                  (cellHeight - fontSize) / 2,
                                  nameSize,
                                  fontSize)];
        cellNameLabel_.font = [UIFont fontWithName:@"Verdana" size:fontSize];
        cellNameLabel_.backgroundColor = [UIColor colorWithRed:0.0
                                                         green:0.0
                                                          blue:0.0
                                                         alpha:0.0];
        [self addSubview:cellNameLabel_];
    }
    return self;
}

- (void)setCellName:(NSString*)cellName {
	cellNameLabel_.text = cellName;
}

- (bool)cellSelected {
    return cellSelected_;
}

- (void)setCellSelected:(bool)cellSelected {
    cellSelected_ = cellSelected;
    if (cellSelected_) {
        self.backgroundColor = [UIColor colorWithRed:0.7
                                               green:0.9
                                                blue:0.9
                                               alpha:1.0];
    } else {
        self.backgroundColor = [UIColor whiteColor];
    }
}

@end
これで目に見えるUI部分の作成は、ほぼ完了です。
次回は、これをUITableに組み込んでいきます。
UITableViewをツリー上に表示する。第1回目(データソースを作成)
facebookアプリでツリー上のテーブルが使われているのを、ご存知でしょうか。こんなやつです。

今回から数回にわたって、同じようなツリー上のテーブルを作成してみたいと思います。イメージはこんな形。
ベースとするプロジェクトは、2012-08-11の記事にあるnibファイルを使わない、iPadアプリです。この記事をベースにプロジェクトを作成してください。
まずは表示するもととなる、データソースを考えます。
親のデータとして必要なものは、名前とツリーの開閉情報、ぶら下がる子供のデータです。
それらを保持できる、次のようなクラスを作ります。
#import <Foundation/Foundation.h>

@interface Animals : NSObject {
@private
    NSString* sectionName_;
    bool openFlag_;
    NSMutableArray* types_;
}
@property(strong, nonatomic) NSString* sectionName;
@property(nonatomic) bool openFlag;
@property(strong, nonatomic) NSMutableArray* types;

- (id)initWithSectionName:(NSString*)sectionName
                 openFlag:(bool)openFlag
                    types:(NSMutableArray*)types;
@end

@implementation Animals
@synthesize sectionName = sectionName_;
@synthesize openFlag = openFlag_;
@synthesize types = types_;

- (id)initWithSectionName:(NSString*)sectionName
                 openFlag:(bool)openFlag
                    types:(NSMutableArray*)types {
    self = [super init];
    if (self) {
        sectionName_ = sectionName;
        openFlag_ = openFlag;
        types_ = types;
    }
    return self;
}

@end
子供として必要なものは、名前とfacebookのUIと異なりますが、セルを選択できるようにしたいと思いますので、選択状態を保持します。
次のようなクラスを作ります。
#import <Foundation/Foundation.h>

@interface CreatureType: NSObject {
@private
    NSString* typeName_;
    bool selected_;
}
@property(strong, nonatomic) NSString* typeName;
@property(nonatomic) bool selected;

- (id)initWithTypeName:(NSString*)typeName
              selected:(bool)selected;

@end


@implementation CreatureType
@synthesize typeName = typeName_;
@synthesize selected = selected_;

- (id)initWithTypeName:(NSString*)typeName
              selected:(bool)selected {
    self = [super init];
    if (self) {
        typeName_ = typeName;
        selected_ = selected;
    }
    return self;
}

@end
次にツリーの本体となる、UITableViewControllerを作成します。UITableViewControllerを基底クラスに、TreeTableViewControllerという名前でクラスを作成します。ついでにデータソースを保持する、配列もメンバ変数で定義しておきます。
#import <UIKit/UIKit.h>

@interface TreeTableViewController : UITableViewController {
@private
    // Data Source
    NSMutableArray* animals_;
}

@end
今回はここまで、次回は親子を表示するためのクラス作成を行います。
Objective-Cで、複数スレッドで並行処理させる。(Producer-Consumerパターン)
今日は、デザインパターンで言うところのProducer-ConsumerパターンをObjective-Cで実装してみます。(GCDで並列化する方法もありますが、今回は使いません。)
複数の処理があった場合、処理を並行に処理したいようなことがあります。
例えば、Webへのリクエストなど、レスポンスの待ちなどが発生する場合は、直列で処理するよりも並行で処理する方が格段に処理速度を改善できる場合があります。
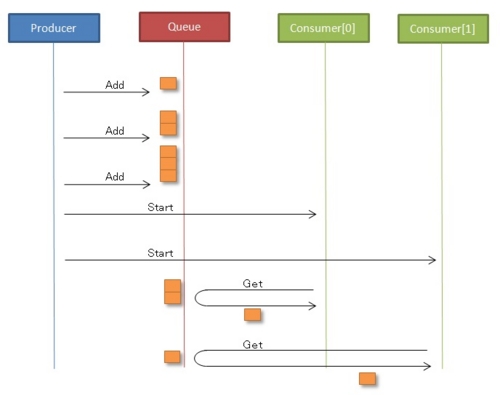
イメージはこんな形、Producer(仕事を作る人)、Queue(仕事を置く台)、Consumer(仕事を処理する人)という登場人物がいます。
Produceが仕事を作って、作業台に置くと、作業者が仕事を取って処理を行うという動作を行います。

まずは、Queueクラス。仕事の受け渡しを行うクラスです。仕事を置くputQueメソッドと、仕事を取り出すgetQueメソッドがあります。
それぞれ、同じ仕事を2人で取ったりしないように、出し入れする際はNSLockクラスのロックをとれた時に操作できるようになっています。
Queue.h
#import "Queue.h"

typedef enum {
    StateIdle,
    StateRunning,
    StateSuspend,
} threadState;

@interface ConsumerThread : NSObject {
    volatile threadState state_;     // 必ず volatile にすること
    NSCondition *cond_;              // state を保護し、状態変化を伝える
    NSString *identifier_;
    Queue *que_;
}

- (id)initWithQue:(Queue*)que identifier:(NSString*)identifier;
- (void)start;
- (void)suspend;
- (void)quit;

- (void)run;

@end
Queue.m
#import "Queue.h"

@implementation Queue

- (id)initWithQue:(NSMutableArray*)queue
{
    theLock_ = [[NSLock alloc] init];
    queObject_ = queue;
    return self;
}

- (void)putQue:(NSObject*)object
{
    [theLock_ lock];
    while (queObject_.count >= MAX_QUEUE_COUNT) {
        // 最大Queue数の仕事が溜まっている場合はwaitする。
        [theLock_ wait];
    }
    // 仕事(後ろに)を追加
    [queObject_ addObject:object];
    [theLock_ unlock];
}

- (NSObject*)getQue
{
    NSObject *firstObject = nil;
    [theLock_ lock];
    if (queObject_.count > 0) {
        // 先頭から取り出し削除
        firstObject = [queObject_ objectAtIndex:0];
        [queObject_ removeObjectAtIndex:0];
        // waitを解除
        [theLock_ signal];
    }
    [theLock_ unlock];
    // QueueがあったらObjectを返す。無かったらnilを返す。
    return firstObject;
}

@end
次は、ConsumerThreadクラスです。これは並行度分生成され実行されます。
performSelectorInBackgroundで呼び出される、runメソッドが別Threadで実行されるようになっています。
runメソッドは、Queからひとつ仕事を取り出して処理を行います。
ConsumerThread.h
#import "Queue.h"

typedef enum {
    StateIdle,
    StateRunning,
    StateSuspend,
} threadState;

@interface ConsumerThread : NSObject {
    volatile threadState state_;     // 必ず volatile にすること
    NSCondition *cond_;              // state を保護し、状態変化を伝える
    NSString *identifier_;
    Queue *que_;
}

- (id)initWithQue:(Queue*)que identifier:(NSString*)identifier;
- (void)start;
- (void)suspend;
- (void)quit;

- (void)run;

@end
ConsumerThread.m
#import "ConsumerThread.h"

@interface ConsumerThread (PrivateMethods)
- (void)run;
@end

@implementation ConsumerThread

- (id)initWithQue:(Queue*)que identifier:(NSString*)identifier{
    self = [super init];
    if (self != nil) {
        cond_ = [[NSCondition alloc] init];
        state_ = StateIdle;
        identifier_ = identifier;
        que_ = que;
    }
    return self;
}

- (void)start {
    [cond_ lock];

    // StateIdleの場合のみ開始
    if (state_ == StateIdle) {
        state_ = StateRunning;
        [self performSelectorInBackground:@selector(run) withObject:nil];
    }

    [cond_ unlock];
}

- (void)suspend {
    [cond_ lock];

    if (state_ == StateRunning) {
        state_ = StateSuspend;
        while (state_ != StateIdle) {
            // 処理の終了を待つ。
            [cond_ wait];
        }
    }

    [cond_ unlock];
}

- (void)quit {
    [cond_ lock];

    if (state_ == StateRunning) {
        state_ = StateSuspend;
        while (state_ != StateIdle) {
            // 処理の終了を待つ。
            [cond_ wait];
        }
    }
    [cond_ unlock];
    // 終了処理
    // ・・・
}

- (void)run {
    @autoreleasepool {
        while (true) {
            // メインの処理
            NSObject *object = [que_ getQue];
            // QueueからObjectが取得できたら、処理を行う。
            if (object) {
                // なんかの処理
                [NSThread sleepForTimeInterval:1.0];
                NSLog(@"Thread(%@) : %@",identifier_, object);
            }
            if (state_ == StateSuspend) {
                break;
            }
        }

        [cond_ lock];
        if (state_ == StateSuspend) {
            // waitしているスレッドを起こす。
            [cond_ signal];
        }
        state_ = StateIdle;
        [cond_ unlock];
    }
}
@end
最後は、Produceクラス。
Queueクラス、ConsumerThreadクラスを生成します。
同じQueueを共有するため、それぞれのConsumerThreadに、同じQueueクラスのインスタンスを引数で渡し生成します。
ConsumerThreadクラスの開始はstartメソッド、停止はquitメソッドで行います。startすると別スレッドでrunメソッドが動きだし、Queueから仕事を取り出して処理を行います。
仕事(Queue)が無くなったのを確認して、ConsumerThreadクラスの停止を行います。
(Producerが単数のパターンを作成しましたが、Producerを複数生成しQueueを共有すれば複数にすることもできます。)
    // Queueの作成
    NSMutableArray *que = [NSMutableArray arrayWithObjects:@"1",@"2",@"3",@"4",@"5",nil];
    Queue *queue = (Queue*)[[Queue alloc] initWithQue:que];

    // Consumerの作成
    ConsumerThread *thread[MAX_THREAD_COUNT];
    for (int i=0; i < MAX_THREAD_COUNT; i++) {
        thread[i] = [[ConsumerThread alloc] initWithQue:queue identifier:[NSString stringWithFormat:@"%d",i]];
        // Consumerの作業開始
        [thread[i] start];
    }

    // 処理完了の待機
    while (que.count > 0) {
        [NSThread sleepForTimeInterval:1.0];
    }

    // Consumerの仕事終了
    for (int i=0; i < MAX_THREAD_COUNT; i++) {
        [thread[i] quit];
    }
Producer-Consumerパターンを使いたいなと思ったのですが、サンプルが見つからなかったので作成してみました。参考になれば幸いです。